Remember that I told you last time that Python if statements are similar to how our brain processes conditions in our everyday life? That’s true for for loops too. You go through your shopping list until you’ve collected every item from it. The dealer gives a card for each player until everyone has five. The athlete does push-ups until reaching one-hundred… Loops everywhere! As for for loops in Python: they are perfect for processing repetitive programming tasks. In this article, I’ll show you everything you need to know about them: the syntax, the logic and best practices too!
Note: This is a hands-on tutorial. I highly recommend doing the coding part with me – and if you have time, solving the exercises at the end of the article! If you haven’t done so yet, please go through these articles first:
- How to install Python, R, SQL and bash to practice data science!
- Python for Data Science #1 – Tutorial for Beginners – Python Basics
- Python for Data Science #2 – Data Structures
- Python for Data Science #3 – Functions and methods
- Python for Data Science #4 – If statements
How to Become a Data Scientist
(free 50-minute video course by Tomi Mester)
Just subscribe to the Data36 Newsletter here (it’s free)!
Thank you!
You have successfully joined our subscriber list.
Python for loops – two simple examples
First things first: for loops are for iterating through “iterables”. Don’t get confused by the new term: most of the time these “iterables” will be well-known data types: lists, strings or dictionaries. Sometimes they can also be range() objects (I’ll get back to this at the end of the article.)
Let’s take the simplest example first: a list!
Do you remember Freddie, the dog from the previous tutorials? Good news: he’s back! Let’s create a list:
dog = ['Freddie', 9, True, 1.1, 2001, ['bone', 'little ball']]
Once it’s created, we can go through the elements and print them one by one – by using this very basic for loop:
for i in dog:
    print(i)

The result is the elements of the list one by one, in separate lines:
Freddie
9
True
1.1
2001
['bone', 'little ball']
Wonderful!
But how does this actually become useful? Take another example, a list of numbers:numbers = [1, 5, 12, 91, 102]
Say that we want to square each of the numbers in this list!
Note: Unfortunately the numbers * numbers formula won’t work… I know, it might sound logical at first but when you will get more into Python, you will see that in fact, it is not logical at all.
We have to do this:
for i in numbers:
    print(i * i)
The result will be:

What happened here step by step is:
- We set a list (
numbers) with five elements. - We took the first element (well actually, because of zero-based indexing, it’s the 0th element) of the list (
1) and stored it into theivariable. - Then we executed the
print(i * i)function, which returned the squared value of1which is also1. - Then we started the whole process over…
- We took the next element – we assigned it to the
ivariable. - We executed
print(i * i)again and we got the squared value of the second element:25. - And we continued this process…
… until we got the last element’s squared value.
This was the most basic example of a Python for loop… but no worries, it won’t get more difficult; only more complex.
The underlying logic of Python for loops
Okay, now that you see that it’s useful, it’s time to understand the underlying logic of Python for loops…
Just one comment here: in my opinion, this section is the most important part of the article. I see many people using simple loops like a piece of cake but struggling with more complex ones. The reason is: they learned the syntax but they don’t get the logic. So please, if anything is unclear, re-read this section again and again… spend time with it! And I promise, later on, you will thank yourself for this investment of time because you will profit a lot from it.
Here’s a flowchart to visualize the process:
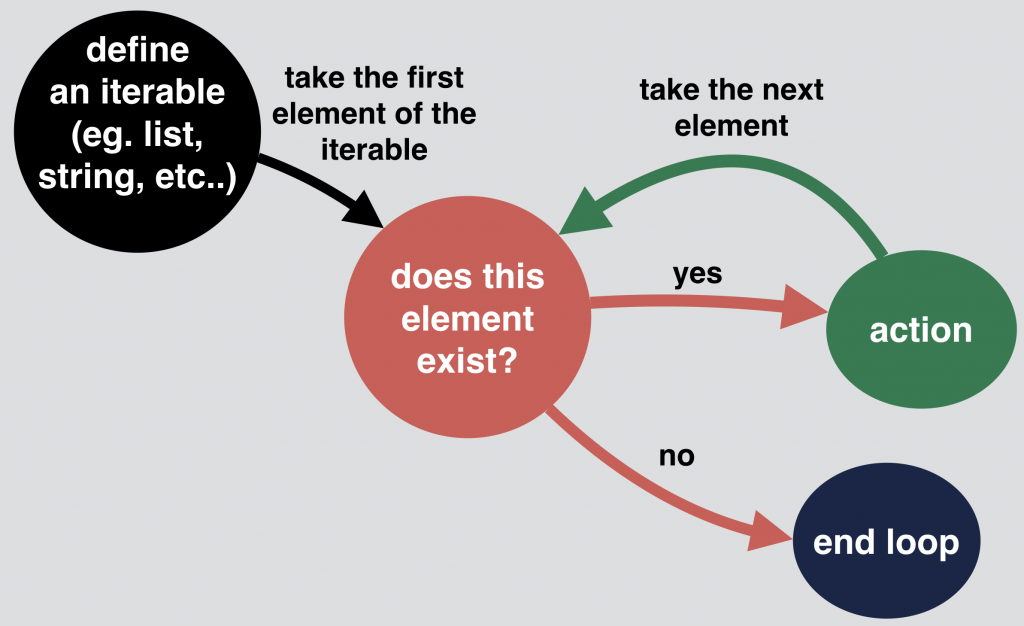
Let’s break down this flowchart and study all the little details… I’ll guide you through it step by step. As an example I’ll use the previous script with the numbers and their squared values:
numbers = [1, 5, 12, 91, 102]
for i in numbers:
    print(i * i)
1.) Define an iterable! (E.g. the list we defined earlier: numbers = [1, 5, 12, 91, 102]).
2.) When you set a for loop, the first line will look pretty similar to this:

for and in are Python keywords and numbers is the name of our list… But, what I want to talk more about in this section is the i variable. It’s a “temporary” variable and its only role is to store the given element of the list that we will work with in the given iteration of the loop. Even if this variable is called i most of the time (in online tutorials or books for instance), it’s good to know that the naming is totally arbitrary. It could not only be i (for i in numbers), but anything else, like x (for x in numbers) or hello (for hello in numbers) or whatever you prefer… The point is, set a variable and don’t forget that you have to refer to it when you want to use it inside the loop.
3.) Stick with our numbers-example! We take the first element of our iterable (well, again – because of zero-based indexing – technically it’s the 0th element of the list). The first iteration of the loop will run! The 0th element of our list is 1. So the i variable is set to 1.
Note: More info about zero-based indexing: here.
5.) The function itself, inside the loop, was print(i * i). As i = 1 the result of i * i will be 1. 1 will be printed to our screen.
6.) The loop starts over.
7.) We take the next element and since there is an actual next element of the list, the second iteration of the loop will run! The 1st element of the numbers list is 5.
8.) So i is 5. print(i * i) runs again and the result is printed to our screen: 25.
9.) The loop starts over. We take the next element.
10.) There is a next element. So here comes the third iteration. The 2nd element of the numbers list is 12.
11.) print(i * i) is 144.
12.) The loop starts over. The next element exists. The iteration runs again.
13.) The 3rd element is 91. The squared value of it is 8281.
14.) The loop starts over. Next element exists. The iteration runs again.
15.) i is 102. The squared value of it is 10404.
16.) The loop starts over. But there is no more “next element.” So the loop ends.
This is a very, very detailed explanation for a 3 line script, right? Don’t worry, it’s enough if you only crunch this once. In the future, you can just go ahead and use those 3 simple lines, because the underlying logic will be in the back of your mind! I find it very important to write this down though, because many junior data professionals do not have this in their back of mind… and that reduces the quality of their Python scripts.
The Junior Data Scientist's First Month
A 100% practical online course. A 6-week simulation of being a junior data scientist at a true-to-life startup.
“Solving real problems, getting real experience – just like in a real data science job.”
Iterating through strings
Okay, going forward!
As I mentioned earlier, you can use other sequences than lists too. Let’s try a string:
my_list = "Hello World!"
for i in my_list:
    print(i)
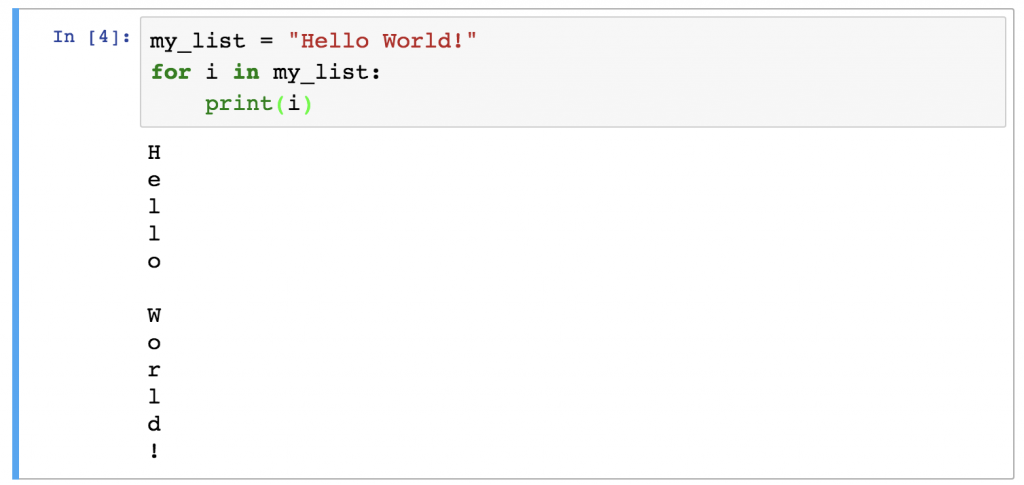
Easy as pie: we got back the characters one by one.
Remember, strings are basically handled as sequences of characters, thus the for loop will work with them pretty much as it did with lists.
Iterating through range() objects
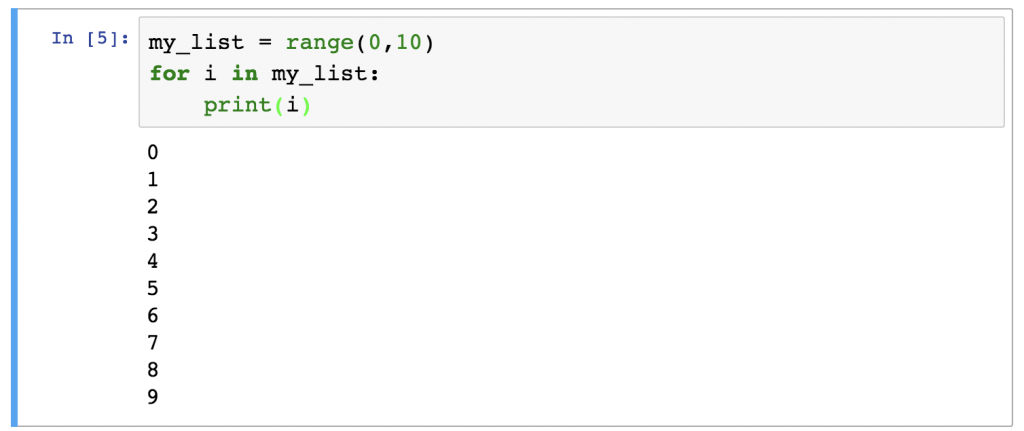
range() is a built-in function in Python and we use it almost exclusively within for loops. What does it do? In a nutshell: it generates a list of numbers. Let’s see how it works:
my_list = range(0,10)
for i in my_list:
    print(i)
It accepts three arguments:
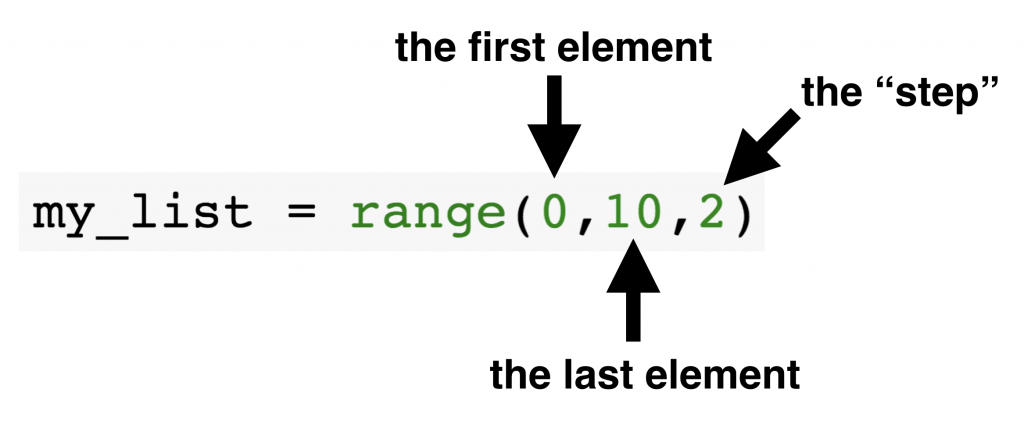
- The first element: this will be the first element of your range.
- The last element: you might assume that this will be the last element of your range… but it isn’t. It’s a Python thing (well actually you can find this in other programming languages too), but you can define here the element after your actual last… Let’s make this clear by an example: if you assign 10 to the last element attribute, the range will go from 0 to 9. If it’s 11 then the range will go from 0 to 10.
Note: If you want to learn more about why Python range() works this way, check out this Quora article: Why are Python ranges half-open (exclusive) instead of closed (inclusive)? - The step: this is the difference between each element in the range. So if it’s 2, you will only print every second element.
Now, can you guess the result of the range above?
Here it is:

Note: the first element and the step attributes are optional. If you don’t specify them, then the first element will be 0 and the step will be 1 by default. Try this in your Jupyter Notebook and check the result:
 my_list = range(10)
 for i in my_list:
     print(i)
When range() can be useful? Mostly, in these two cases:
1.) You want to go through numbers. For instance, you want to cube the integers between 0 and 9? Not a problem:
my_list = range(1,10,2)
for i in my_list:
    print(i * i * i)

2.) You want to go through a list but want to keep the indexes of the elements too.
my_list = [1, 5, 12, 91, 102]
my_list_length = len(my_list)
for i in range(0,my_list_length):
    print(i, my_list[i] * my_list[i])

In this case i will be the index and you can get the actual elements of the list with the my_list[i] syntax – just as we have learned in the Python Data Structures article.
Anyway: use range() – it will make your job with Python for loops easier!
Best practices and common mistakes
Finally let me share some best practices:
- I know from my data coding workshops that Python for loops are not necessarily easy the first time. They need some sort of algorithmic thinking. Of course, the more you practice, the better you become… But if you get a really difficult task, it’s always a good tactic to get a paper and sketch up the logic first. Go through the first few iterations on paper, write down the results – and things will be much clearer!
- Just as with if statements, be careful with the syntax. At the end of the
forline, a colon is required. And at the beginning of the lines in the loop’s body you have to use indentations. - You can’t print strings and integers in one
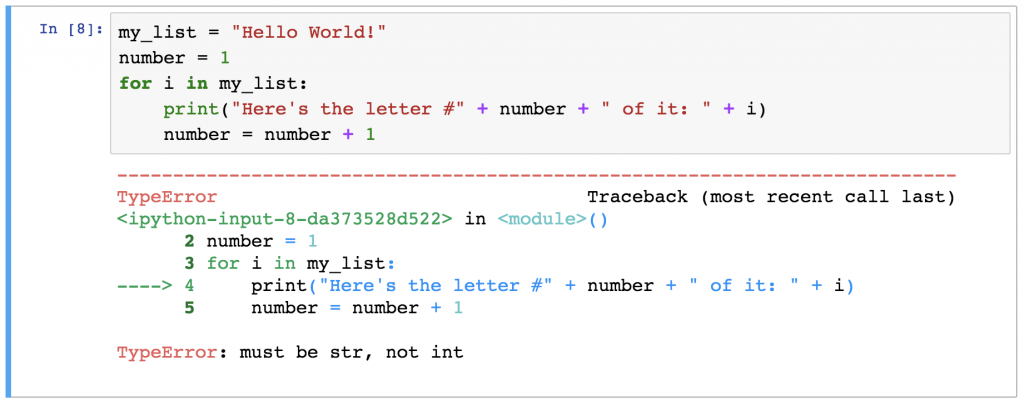
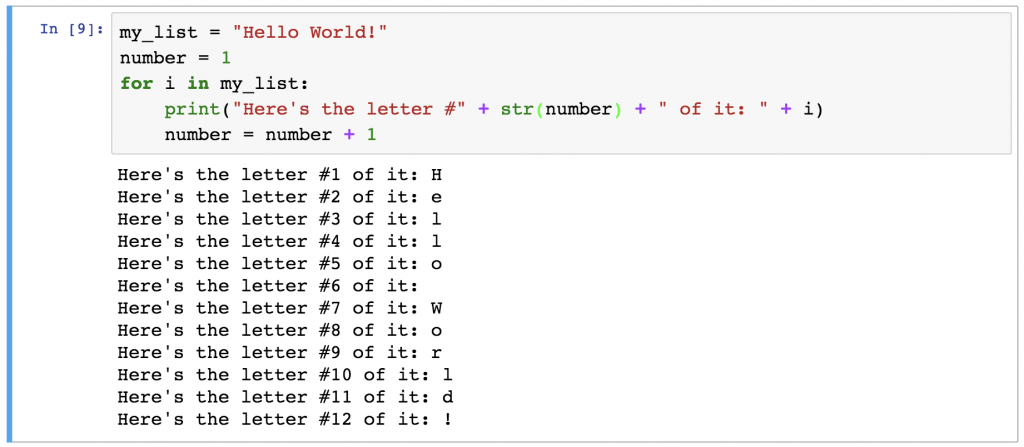
print()function by simply using the+sign. This is more a print-function-thing than a for-loop-thing but most of the time you will meet this issue in for loops. E.g.:
If you see this, one of the good solutions is: turning your integers into strings by using thestr()function! Here is the previous example with the right syntax:
Okay, we have done this!
Exercise time!
Test yourself!
Here’s a nice for-loop-exercise:
Take a variable and assign a random string to it.
Then print a pyramid of the string like in this example:
my_string = "python"
OUTPUT:
p
py
pyt
pyth
pytho
python
pytho
pyth
pyt
py
p
Write a script that does this for any my_string value!
Okay! Let’s go!
The solution
Note: There is more than one way to solve this task. I’ll show you a relatively simple solution, but feel free to send in your alternative solutions via email!
my_string = "python"
x = 0

for i in my_string:
    x = x + 1
    print(my_string[0:x])

for i in my_string:
    x = x - 1
    print(my_string[0:x])
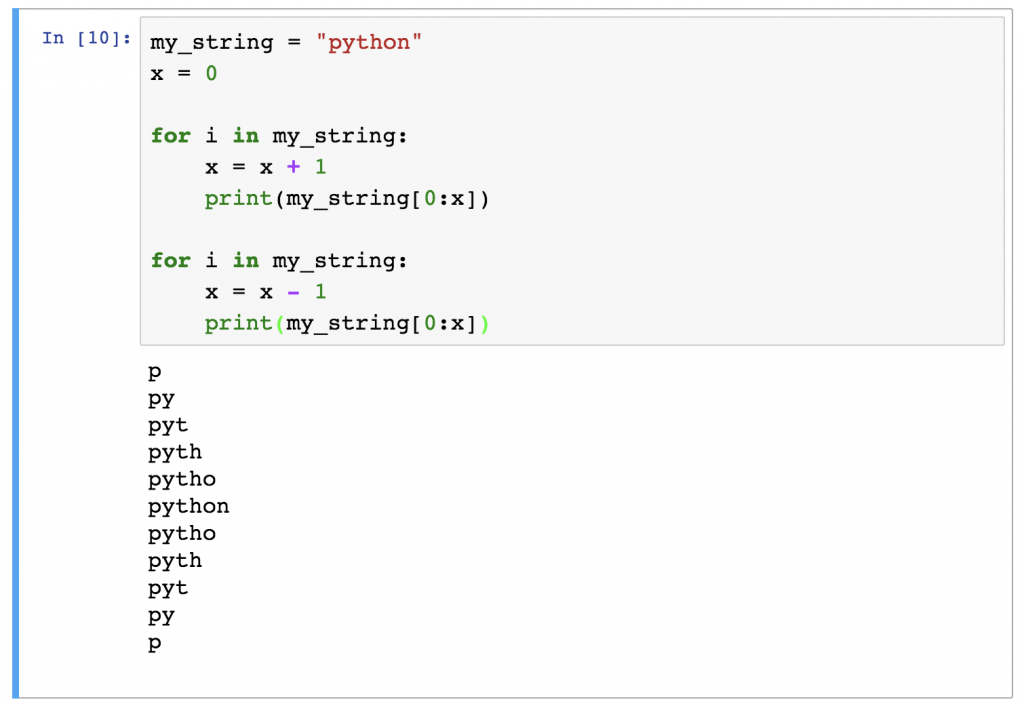
I think the solution is quite self-explanatory. The only trick is that I did set a “counter-variable” called x that always shows the number of characters that I want to print to the screen in the given iteration. In the first for loop this goes up until I reach the number of maximum characters. After that, in the second for loop, it goes down until I have zero characters on the screen.
Note: If the my_string[0:x] syntax does not look familiar, check the Python Data Structures article – and the “How to access multiple elements of a Python list?” section.
Conclusion
Python for loops are important and they are used widely in data scripts. The syntax is simple, but as you have seen, to fully understand the logic behind it requires a little bit of brainwork. But by reading this article, you got through it and now you have a solid foundation to build on. So all you have to do is a bit more practicing to become master of loops! 🙂
In the next article I’ll write about how to combine for loops with for loops and for loops with if statements. It’s gonna be exciting!
- If you want to learn more about how to become a data scientist, take my 50-minute video course: How to Become a Data Scientist. (It’s free!)
- Also check out my 6-week online course: The Junior Data Scientist’s First Month video course.
Cheers,
Tomi Mester
Cheers,
Tomi Mester


