It’s time to continue with learning data science and data coding in Bash! Last time I covered the very basic orientation commands. Now we’re moving on with the most important data cleaning and data shaping commands.
Note 1: to get the most out of this article, you should not just read it, but actually do the coding part with me! So if you are on your phone, I suggest you save this article and continue on Desktop!
Note 2: If you don’t have the data infrastructure yet, you can install it on your own in roughly 30-60 minutes: Data Coding 101 – Install Python, R, SQL and bash!
Note 3: If you haven’t read it, I suggest starting with bash ep#1 first: Data Coding 101 – Intro to Bash ep#1.
How to Become a Data Scientist
(free 50-minute video course by Tomi Mester)
Just subscribe to the Data36 Newsletter here (it’s free)!
Thank you!
You have successfully joined our subscriber list.
Options in Bash
When you execute a command, you can execute its main function. Or with an “option,” you can execute a modification. Let’s see a concrete example and you will get it in a second. Last time we learned the wc command (stands for “word count”). Let’s go back to our practice library and try these 5 commands one by one:
wc flightdelays.csvwc -c flightdelays.csvwc -w flightdelays.csvwc -l flightdelays.csvwc -L flightdelays.csv
wc by itself counted the lines, the words and the characters in your file, then printed it on your screen.
wc -ccounted only the characters,wc -lonly the lines,wc -wonly the words.
But can you find out what wc -L did? Well, don’t spend too much time guessing – because it’s almost impossible to figure out by yourself… 😉 It counted the number of characters in the longest line of your file.
The takeaway is that you can add options to your commands with the dash plus a character combination (e.g. -v).
What kind of options exist? I’ll show you the most important ones for each command we go through here. Then later I’ll show you how you can find more.
Print to file with bash
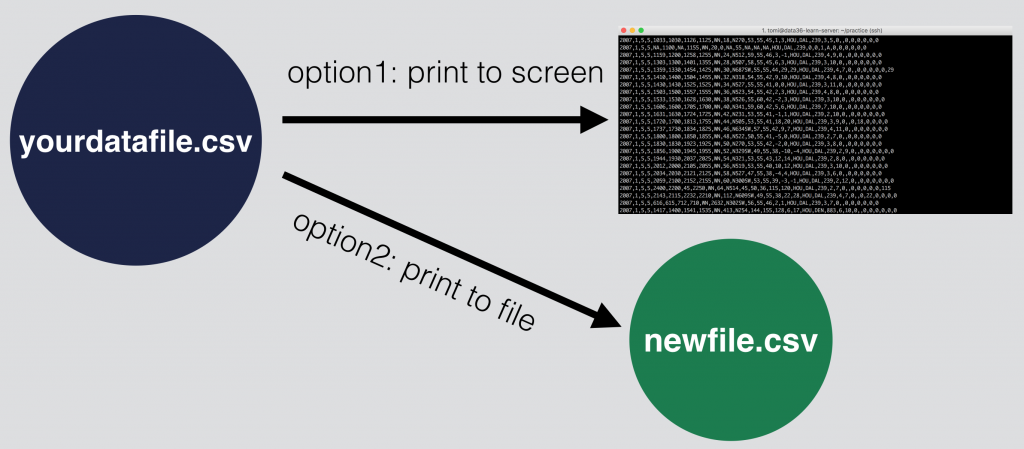
Another important bash concept to understand is what happens with your data when you execute a command. By default the result will be printed on your Terminal screen. Alternatively you can “save” this result by putting it into a (new) file.
As a simple example, last time we printed the first 10 lines of our file to our screen using head (head flightdelays.csv). But if you add an extra > sign and a new filename, it will print the same result not on your screen, but to a new file – so you can use this modified data any time in the future. Test this bash command:
head flightdelays.csv > first_ten_lines.csv
Note: It’s good to know that if the “first_ten_lines.csv” file didn’t exist before, it will be created. If it did exist (e.g. if you re-run this command in the future), then it will be overwritten.
Once you are done, list (ls) the files from your “practice” directory and you will find that this new file (first_ten_lines.csv) is there for real. You can cat it too. Drumroll… the new file indeed has the first 10 lines of the flightdelays.csv.
Test yourself #1
Here’s a little assignment to test yourself. It’s based on the above, so I can assure you: you can solve this. You will need an extra hint though: head and tail commands have options to print not 10 rows, but as much as you want.
(E.g. head -100 flightdelays.csv will print the first 100 rows of a file. The tail -23 flightdealys.csv will print the last 23 rows of the file.)
That said, here’s the exercise:
Print only the 1824th line of the flightdelays.csv file into a new file, called 1824.csv!
…
…
And here’s the solution. (Check out wether you solved it right):
head -1824 flightdelays.csv > tmp.csv–» this prints the first 1824 lines of flightdelays.csv into a temporary file, that I named tmp.csv. (You can name it however you want.)tail -1 tmp.csv > 1824.csv–» this one cuts the last line of the tmp file, then place that one line to the 1824.csv. Got it, right? The last line of the first 1824 lines is the 1824th line. 😉cat 1824.csv–» a simple proof-check. If you did everything right, you should get this data back (check the picture for the full row):2007,1,2,2,741...
Nice job there!
The concept of pipe in Bash
This is the last main concept regarding data coding in bash that you have to know. And this one will make your job so much easier. Remember, I told you that there are two alternatives to print your results:
- to your screen,
- to a new file.
Well, there’s a third one: pass the results onto a new command.
But what does this mean exactly?
Often when it comes to data cleaning and data transformation, one bash command is not enough to do the job – you need to apply several commands after each other. This is exactly what we did in the exercise above. Run a command, put results into a temporary file, then run another command and so on and so forth.
With pipe, you can skip the temporary file part – and redirect your modified data directly to a new command.
By the way, the pipe character looks like this: |
Let’s try it! Type this into your command line:
head -1824 flightdelays.csv | tail -1
And you will see the same results you had before. The difference is that all this happened in one line.
Again the above returns exactly the same result as this one did:
head -1824 flightdelays.csv > tmp.csvtail -1 tmp.csv
It’s just much shorter.
Don’t worry if you don’t get this pipe-thingy immediately. I’ve held several workshops about data coding in bash, and I found that this is the most difficult to understand bash concept for first-timers. Just re-read this subchapter as many times as you want, spend some time processing it – and if you are still not 100% sure, that’s just okay. We will use pipe so many times in my data coding tutorials that I guarantee you will understand it sooner or later! 😉
Test yourself #2
Here’s another exercise:
Count the number of characters in the first 100 lines of flightdelays.csv! Do it by using the | pipe character.
…
…
Okay. Are you done?
Here’s my solution:
head -100 flightdelays.csv | wc -c
And the result is: 9269
I can’t emphasise enough that you can get the same result if you do this in two steps. But it’s not the shortest way.
head -100 flightdelays.csv > tmp.csv(Note that this command will overwrite your previous tmp.csv file.)wc -c tmp.csv
Print specific columns: cut
Okay, you have learned the 2 main concepts. In the second half of this article we will focus on some new command line tools.
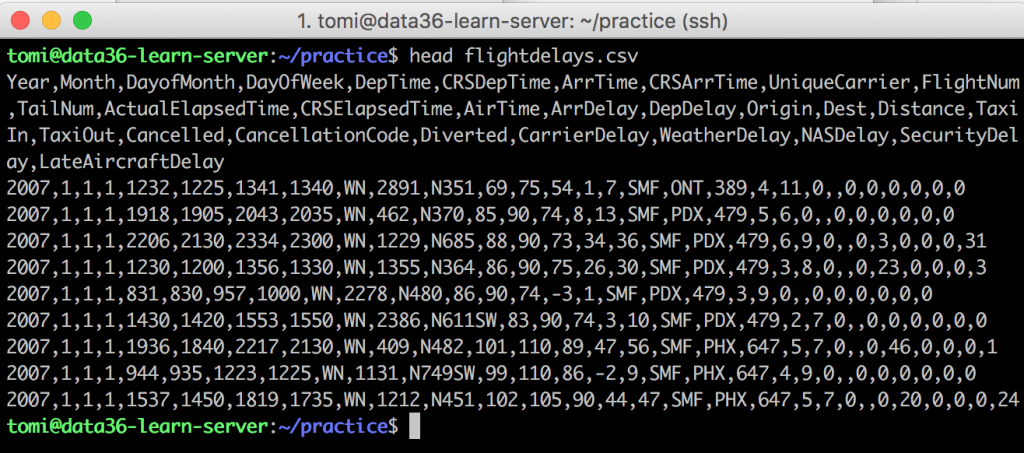
The first one is cut, which you can use to print specific columns. Why is it needed? Well, print the first 10 lines of your files on your screen again:
head flightdelays.csv
See the first line of your file? It’s the header. And boy, that’s a mess. It’s so long that your Terminal had to break it into more lines… But usually you don’t need all the columns. Let’s say that we want to run a predictive analytics project and we need only these five columns:
- Year (column #1)
- Month (column #2)
- DayofMonth (column #3)
- ArrDelay (column #15)
- DepDealy (column #16)
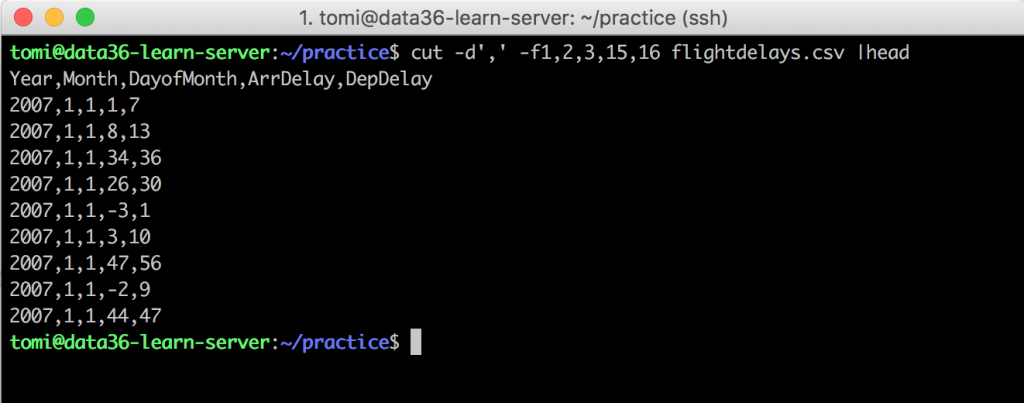
To keep only these five columns, let’s use cut:
cut -d',' -f1,2,3,15,16 flightdelays.csv
If you type this bash command, you will see an endless (okay, not endless, but very long) data-flow on your screen. So let’s use head with a pipe | and keep the first 10 rows only:
cut -d',' -f1,2,3,15,16 flightdelays.csv |head
Much better!
Some explanation of what happened here:
We used the cut command with 3 arguments; 1 of these was the filename (flightdelays.csv) and the rest were options. (Remember? The stuff with the dash character!). One by one:
cut –» the main command-d',' –» the dash tells bash that this is gonna be an option, d (stands for the word “delimiter”) says that we will specify the delimiter, and ',' says the delimiter itself is gonna be a comma.-f1,2,3,15,16 -–» again, dash means that this is gonna be an option, f (stands for “field”) lets bash know that we are gonna specify which exact columns we want to get back, and the numbers are the number of the columns.flightdelays.csv –» the file we want to execute the command on
Note that the delimiter could be anything. If your file is delimited with ; then you can specify it with cut -d’;’ -f1,2 filename.csv or if it’s delimited with -, then it’s cut -d’-’ -f1,2 filename.csv, etc…
Aaand: that’s it! This is how cut works.
Try to print other columns, maybe combining cut with the head command (use pipe! |). Once you are confident with cut, I’ll continue with…
Filter to specific rows: grep
…grep. grep is pretty much the same as the “filter” function in Excel. It can help you to get specific rows, based on the pattern (characters, words, numbers, etc…) you filter on. The most basic way to use it is to print lines containing your filter-string (a sequence of characters):
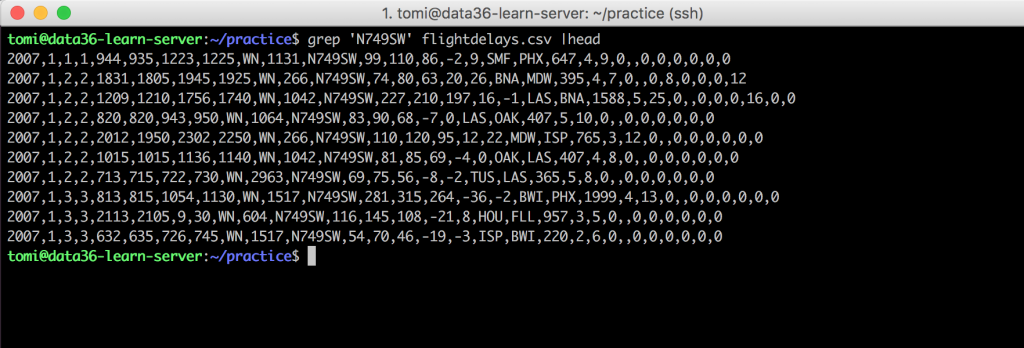
grep 'N749SW' flightdelays.csv
If you try this command (note that – as per usual – I used it with head to have only the first 10 lines printed), on your screen you will see all the lines that contain the 'N749SW' string. Anyway, they will pop up in the TailNum column. (It’s the unique identifier of the airplanes.)
So the format is: grep 'your_filter_word' your_file.csv
As you can see we did not tell bash in which column we would like to see our pattern. This is because it’s not possible (unfortunately). Let me show you a simple case where this becomes problematic. Try for instance to grep for DAL (Dallas). See? You get all the lines with DAL – regardless if the string is in the Origin or in the Dest column.
If it doesn’t look like an issue to you, it will on the next Test yourself section. 😉
But before that I’ll show you some useful grep options:
grep -v 'N749SW' flightdelays.csv – the exact opposite of the original command. It returns everything but the lines with ‘N749SW’.
grep -i 'n749sw' flightdelays.csv – by default grep is case-sensitive (meaning it matters if you type in a capital or lowercase letter). If you use -i, it won’t be case-sensitive anymore.
grep -n 'N749SW' flightdelays.csv – this one prints the line-number before the actual line. It will be handy, believe me.
I’ll show you some more, but it’s time to finish up this tutorial with the last section of…
Test yourself #3
This is the ultimate exercise that covers everything you’ve learned so far in this article (and in the previous one). Here it is:
Take the original file (flightdelays.csv) and print:
- the Arrival Delay (column name: ArrDelay) data
- for the flights that depart (column name: Origin) from San Francisco Airport (parameter name: SFO)
- print only the first 3 of those
- into a new file called: first3sfo.csv
Try to do it with only one line of command!
Hint 1: You have to use the pipe | character multiple times. If it wasn’t clear: something like tail file.csv | grep xxx | cut -d’,’ -f1,2,3 | head -3 > yyy.csv is totally valid bash syntax! You are just continuously passing the data onto the new commands and eventually into your file.
Hint 2: you don’t need to find the solution on the first try. Take advantage of the fact that bash is a very iterative data coding language. You can try, fail, then fine-tune your command. Once you have the correct result on your screen, then you can save it into a new file.
…
…
Done?
Then I’ll show you the solution:cut -d',' -f15,17 flightdelays.csv | grep SFO | head -3 | cut -d',' -f1 > first3sfo.csv
If you cat first3sfo.csv, you will get these results:-8
17
-8
Some explanation step by step:cut -d',' -f15,17 flightdelays.csv – Cut keeps only 2 columns from our file: the ArrDelay, what we are looking for, and the Origin, that we will use for filtering out the SFO departures. It’s important not to keep the Dest column, otherwise the next grep command would use that column for filtering too.
grep SFO – This filters for all the lines that have “SFO” in them. As we have kept 2 columns only and one of those is a number, this will filter only based on the “Origin” column.
head -3 – Keep the first 3 lines only.
cut -d',' -f1 – And after all, we don’t really need the Origin column anymore – as we used it only for grep-ing the SFO departures. So just remove it. Did you notice, that the number of the ArrDelay column has changed (not 15th, but 1st)? This is because this last cut command’s input was the already modified data, which contained only 2 columns.
Then print this whole stuff to a new file: > first3sfo.csv
(For those who would like to torture themselves by not using pipe, but tmp files – this is another possible way to get this done:
cut -d',' -f15,17 flightdelays.csv > tmp.csvgrep SFO tmp.csv > tmp2.csvhead -3 tmp2.csv > tmp3.csvcut -d',' -f1 tmp3.csv > first3sfo.csv
But please: do the pipe version instead of this. 🙂
A common mistake could be to change the order of the commands.
E.g. If you first grep to SFO, it won’t just return the flights departing from SFO, but the flights arriving to SFO as well – as I’ve described it already – so you will have some unnecessary “garbage” in your data. Or if you first use head -3, these 3 rows won’t contain any SFO related data, so if you grep after this to ‘SFO’, you will get back 0 lines. And so on… Make sure, you use the correct order!
Conclusion
Boom! You have just picked up another great piece of knowledge about data science in bash.
You have learned the 3 main concepts: options, pipes and printing to a file. Plus, you have learned 2 new commands as well: cut and grep.
I’ll continue from here (UPDATE: for episode 3, click here).
- If you want to learn more about how to become a data scientist, take my 50-minute video course: How to Become a Data Scientist. (It’s free!)
- Also check out my 6-week online course: The Junior Data Scientist’s First Month video course.
Cheers,
Tomi Mester
Cheers,
Tomi Mester


