
In this article, I’ll show you how to use Jupyter Notebook.
Jupyter is one of the most popular tools if you want to work with Python. It’s especially popular amongst data scientists. I, for instance, use it every day when I prototype my Python scripts or different Python-based analyses and algorithms.
In this article, I’ll show you the basics, so if you are completely new to this world, now you can quickly learn how to use Jupyter Notebook!
Note: if you want to check out all episodes of my Python for Data Science tutorial series — you can do that here or on Youtube.
But for now: let’s get started!
Open a new Jupyter Notebook!
I’ve already shown you how to install a Jupyter notebook to your computer using Anaconda — and I have a detailed article on the blog about how to install a whole remote server if you want to do things as real data scientists do. If you don’t have at least one of these yet, do the installation first — then come back and continue with this article.
Okay. Ready? Let’s move on!
Your first step is to open a Jupyter Notebook!
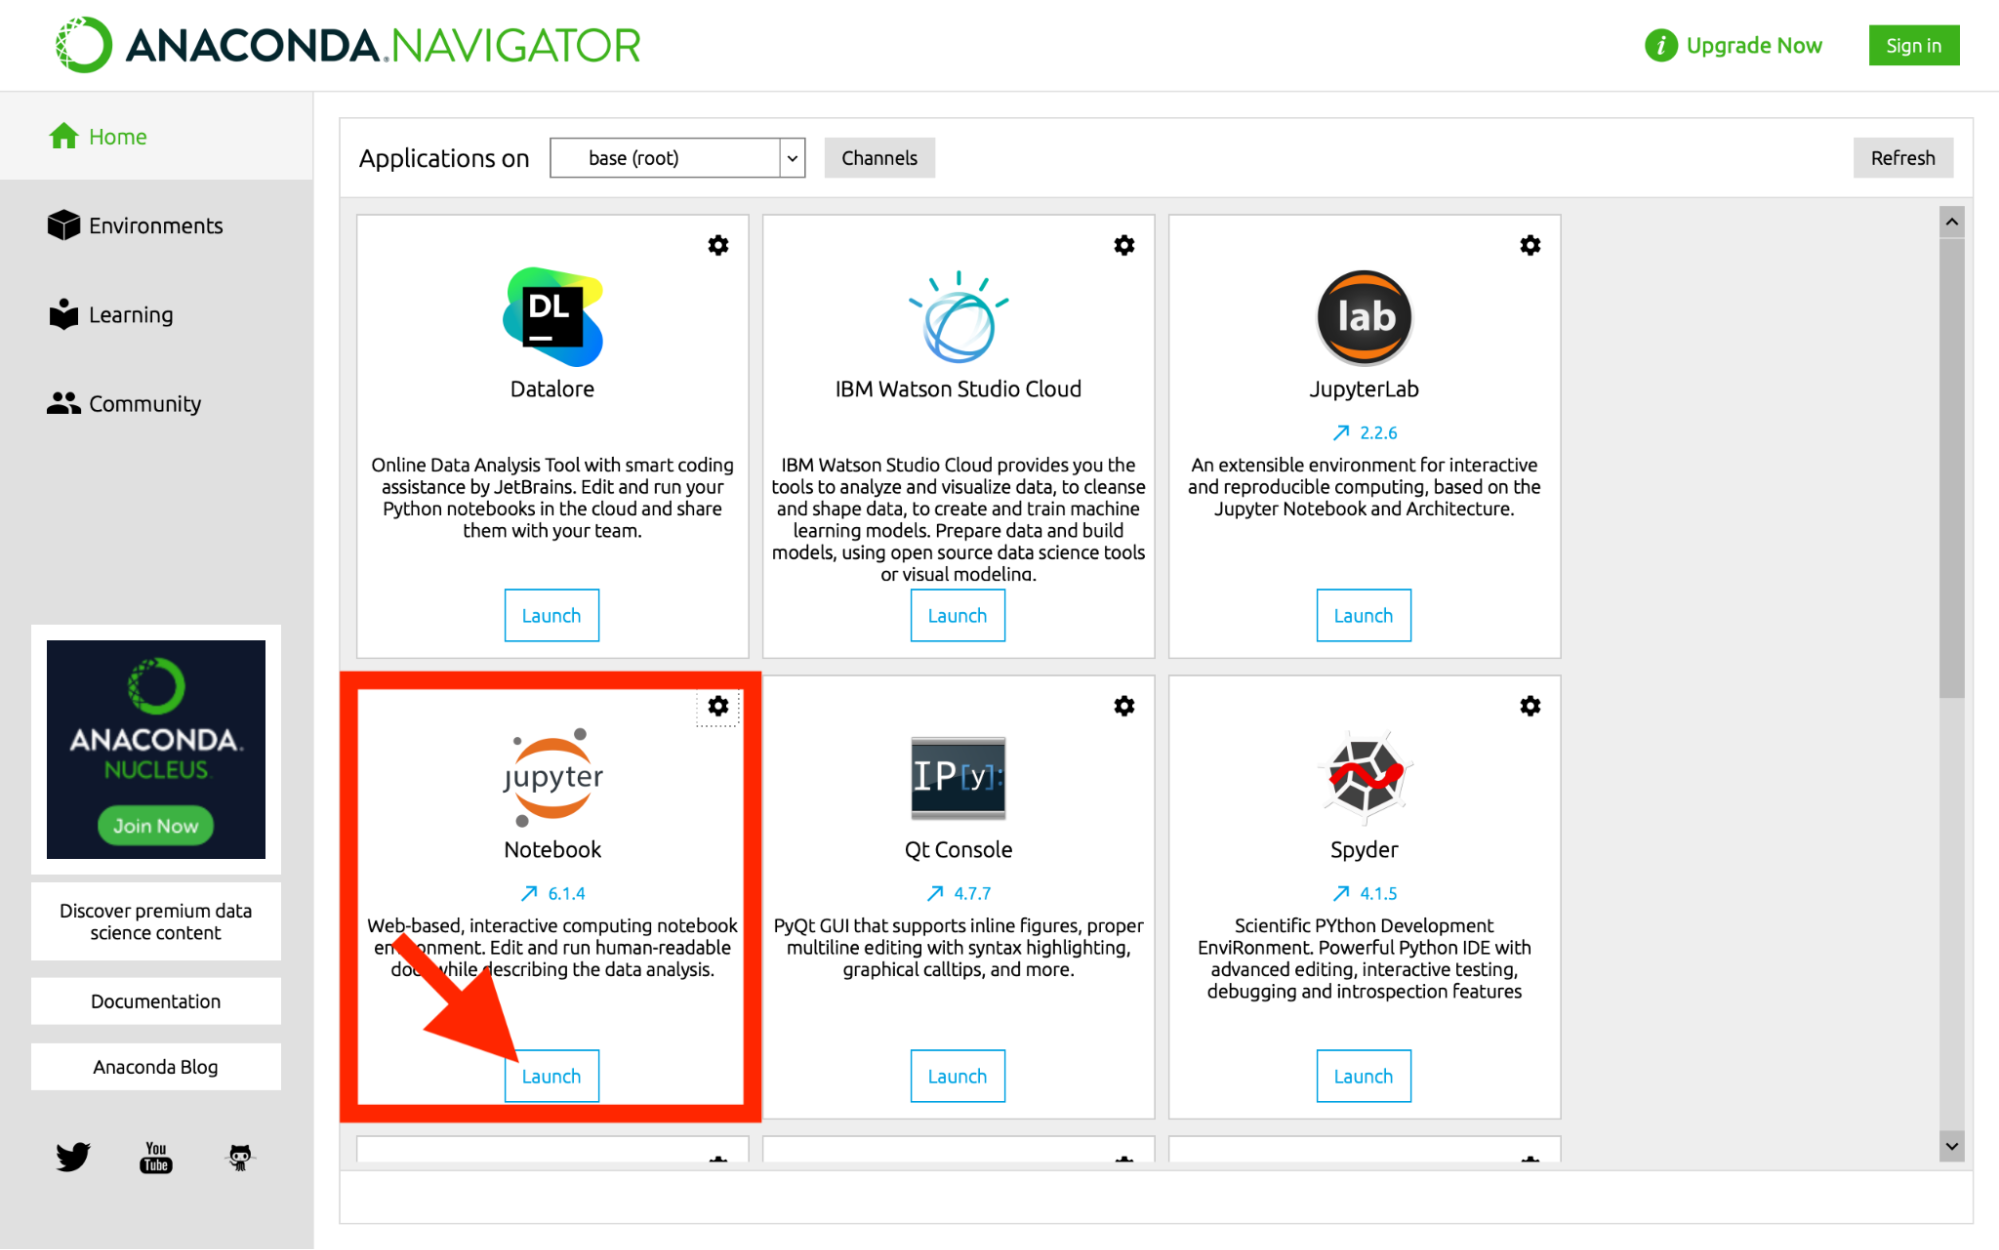
I’ll use Anaconda for that!
- I’ll start Anaconda…
- I’ll click
LaunchJupyter — which opens in a browser.
- I’ll go to the right folder…
- In the top right corner I’ll click
Newand thenPython3
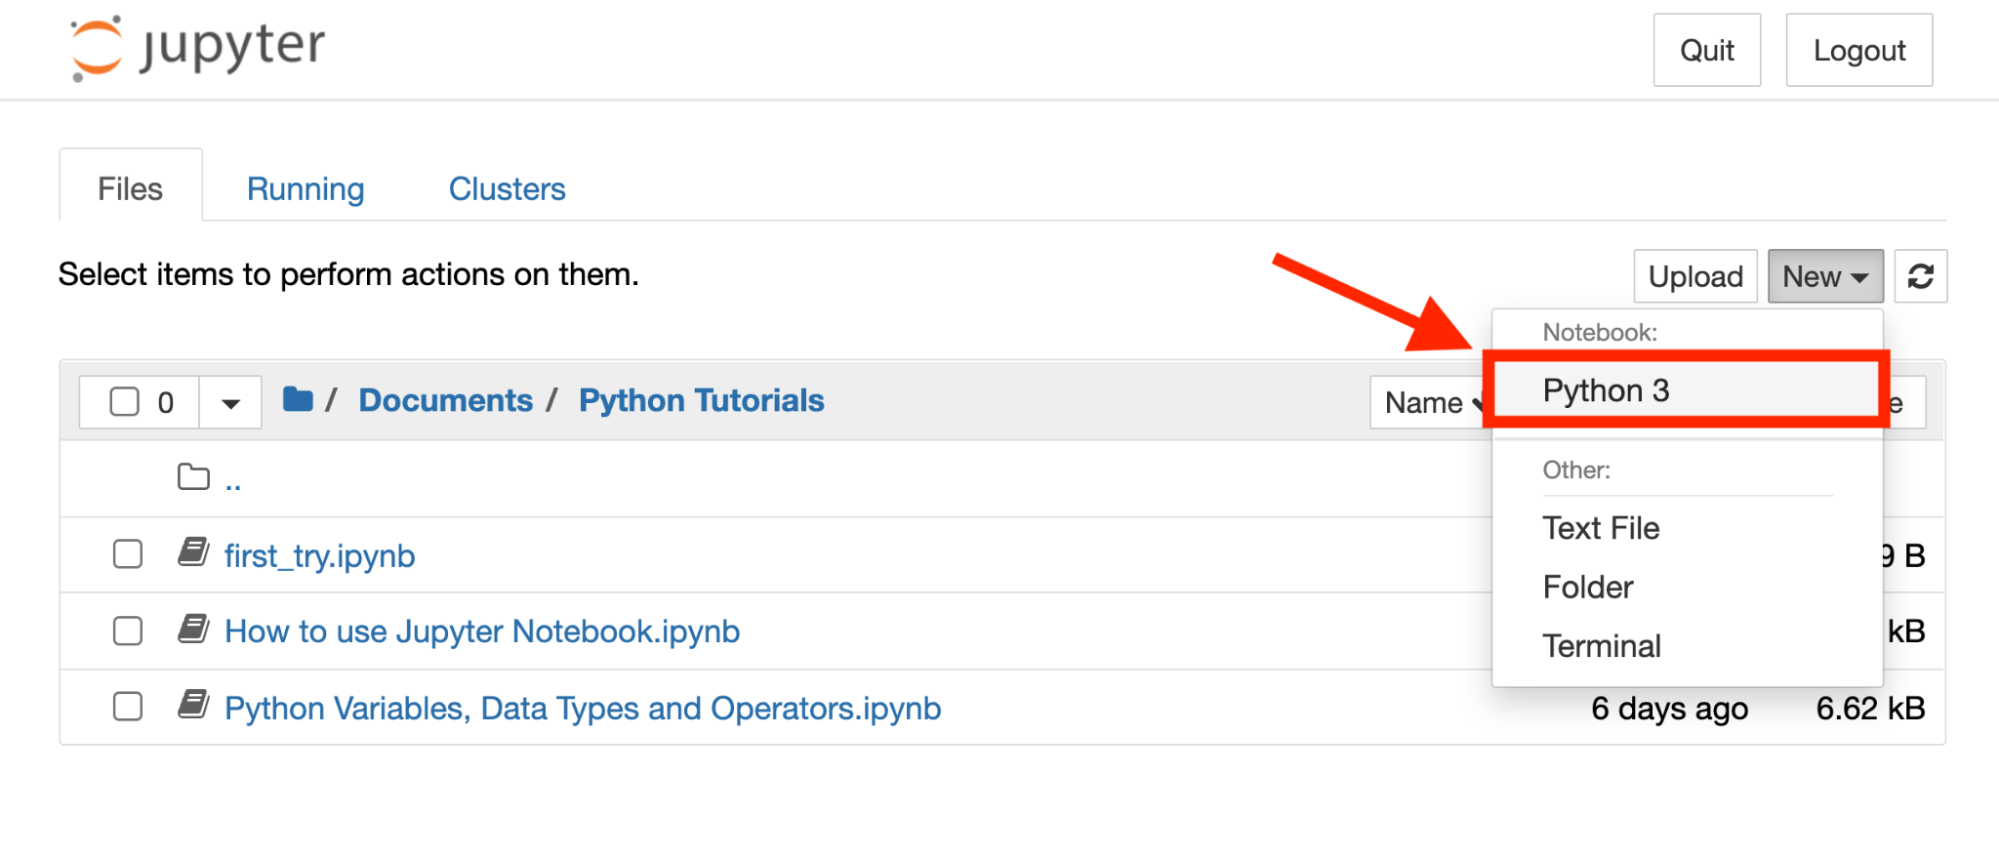
This opens a new Jupyter Notebook. Awesome!
Let’s name it How to use Jupyter Notebook and we are ready to go.
How to Use Jupyter Notebook: Basics
Now you have an empty Jupyter Notebook. As you know, here, you can run all kinds of Python code.
Running your Python code in a cell
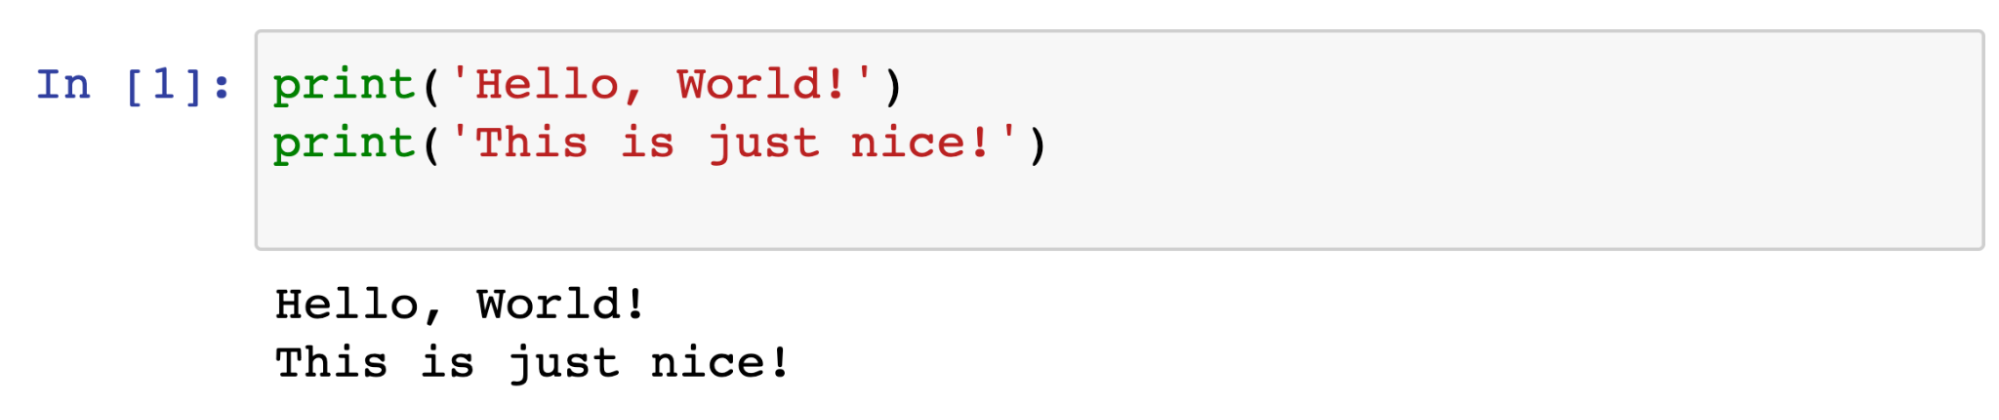
The first step is obviously to type some Python code into the first cell. It can be a multi-line command, too. But if you hit enter, it won’t run, it will just start a new line in the same cell!

So to actually run your Python code in Jupyter Notebook, you’ll have to hit SHIFT + ENTER.
Of course, instead of hotkeys you can always work with the icons on the top bar.
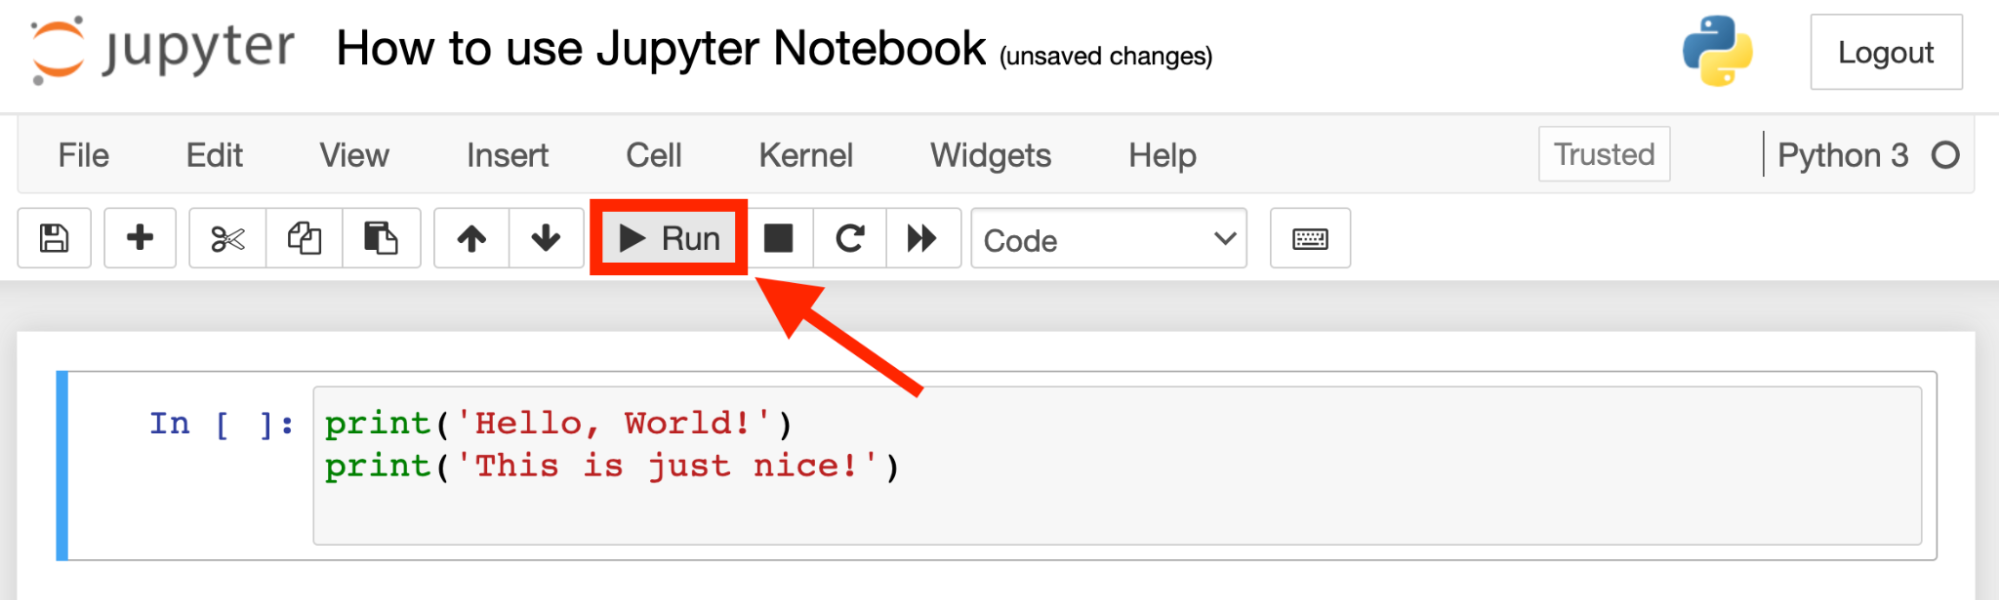
For instance, you could run your code by clicking the Run button. But I strongly recommend learning the hotkeys at least for the most important features because that’ll save a lot of time for you.
So to run a cell hit SHIFT + ENTER!
Auto-completion in Jupyter
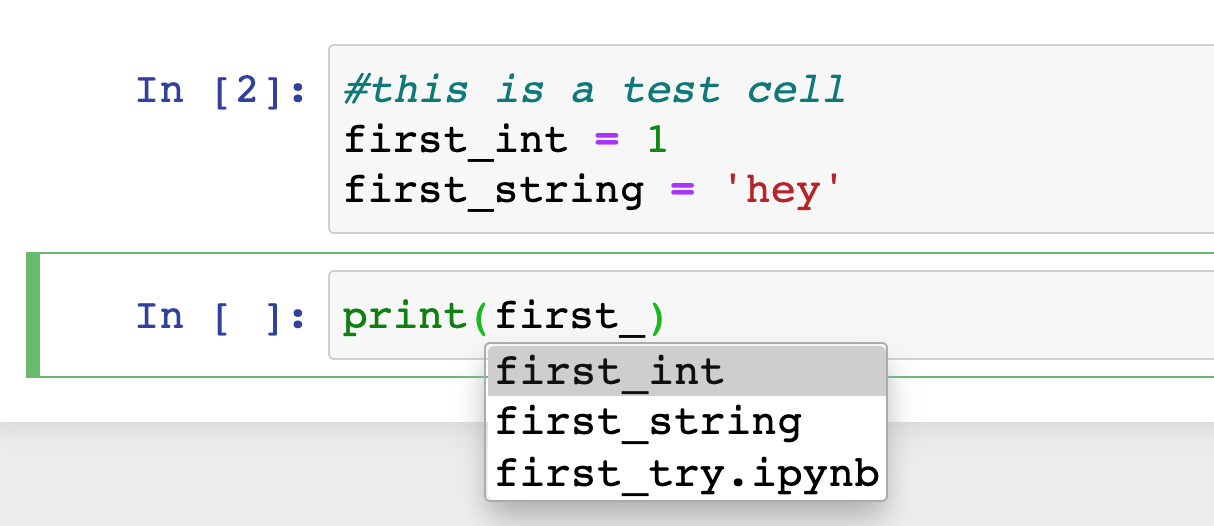
Start typing and hit the TAB key on your keyboard!
If it’s possible, Jupyter will auto-complete your expression (e.g. Python keywords or the variables that you have already defined). If there is more than one possibility, you can choose from a drop-down menu that pops up.
Adding new cells or removing existing ones (in Command Mode)
Manipulating cells in a Jupyter Notebook is essential.
You can:
- add new cells,
- remove existing ones,
- copy them,
- paste them,
- and so on.
How do you do that?
An easy way — again — is to do this from the top menu.
Just click Edit and choose the operation you want, like Cut cell. It’ll cut the selected cell.
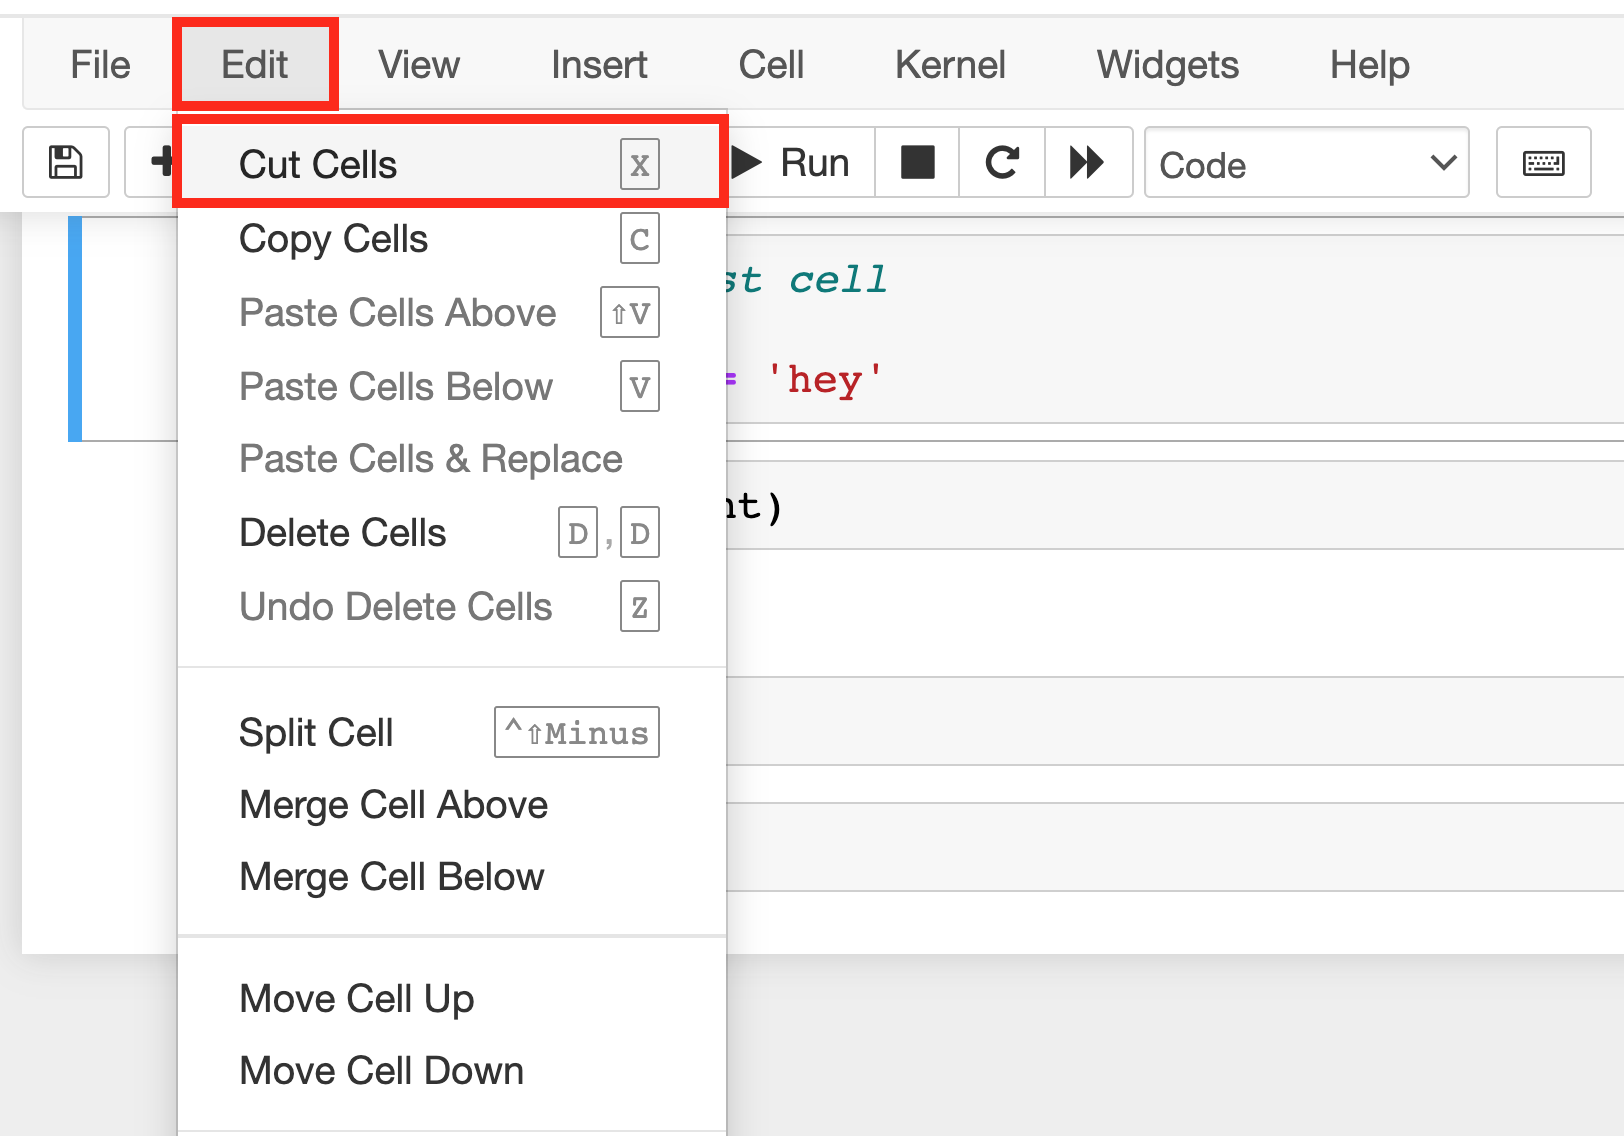
You can use the Insert menu similarly, if you want to add new cells. That’s common sense. There’s nothing special in that.
But as I said, doing this with hotkeys is much faster and more practical. However it will be quite unusual, if you haven’t worked with text editors for coding before. Let me guide you through this!
- Select the cell you want to copy or delete or whatever…
- Notice the green frame around your cell…

- Now, hit the
Escapekey on your keyboard! The green frame will turn blue. This means that you can use your hotkeys. Jupyter Notebook calls this “Command Mode“.
- Now, if you want to add a new cell above your selected cell, you’ll just have to hit the
Akey on your keyboard. Or hitBto add one below.
Note that you don’t have to hitEscapeagain before you hitB— as long as you see the blue frame, you are in command mode, so you can manipulate your cells with hotkeys.


Similarly, if you want to copy a cell, just click on it, hit the Escape key. The frame will turn blue — that means that now you can hit C to copy the cell and then hit V to paste it below.
Once you are done, hit Enter (or just click your cell). You are now back to “Edit mode” and you can type and run your code.
How to Use Jupyter Notebook: a few best practices
Editing shortcuts
Speaking of shortcuts… You can easily check out all the available shortcuts if you go to the top menu’s Help submenu and click Keyboard shortcuts.
Note: Actually, there’s a shortcut to check out the shortcuts: switch to command mode with Escape and then hit H on your keyboard.
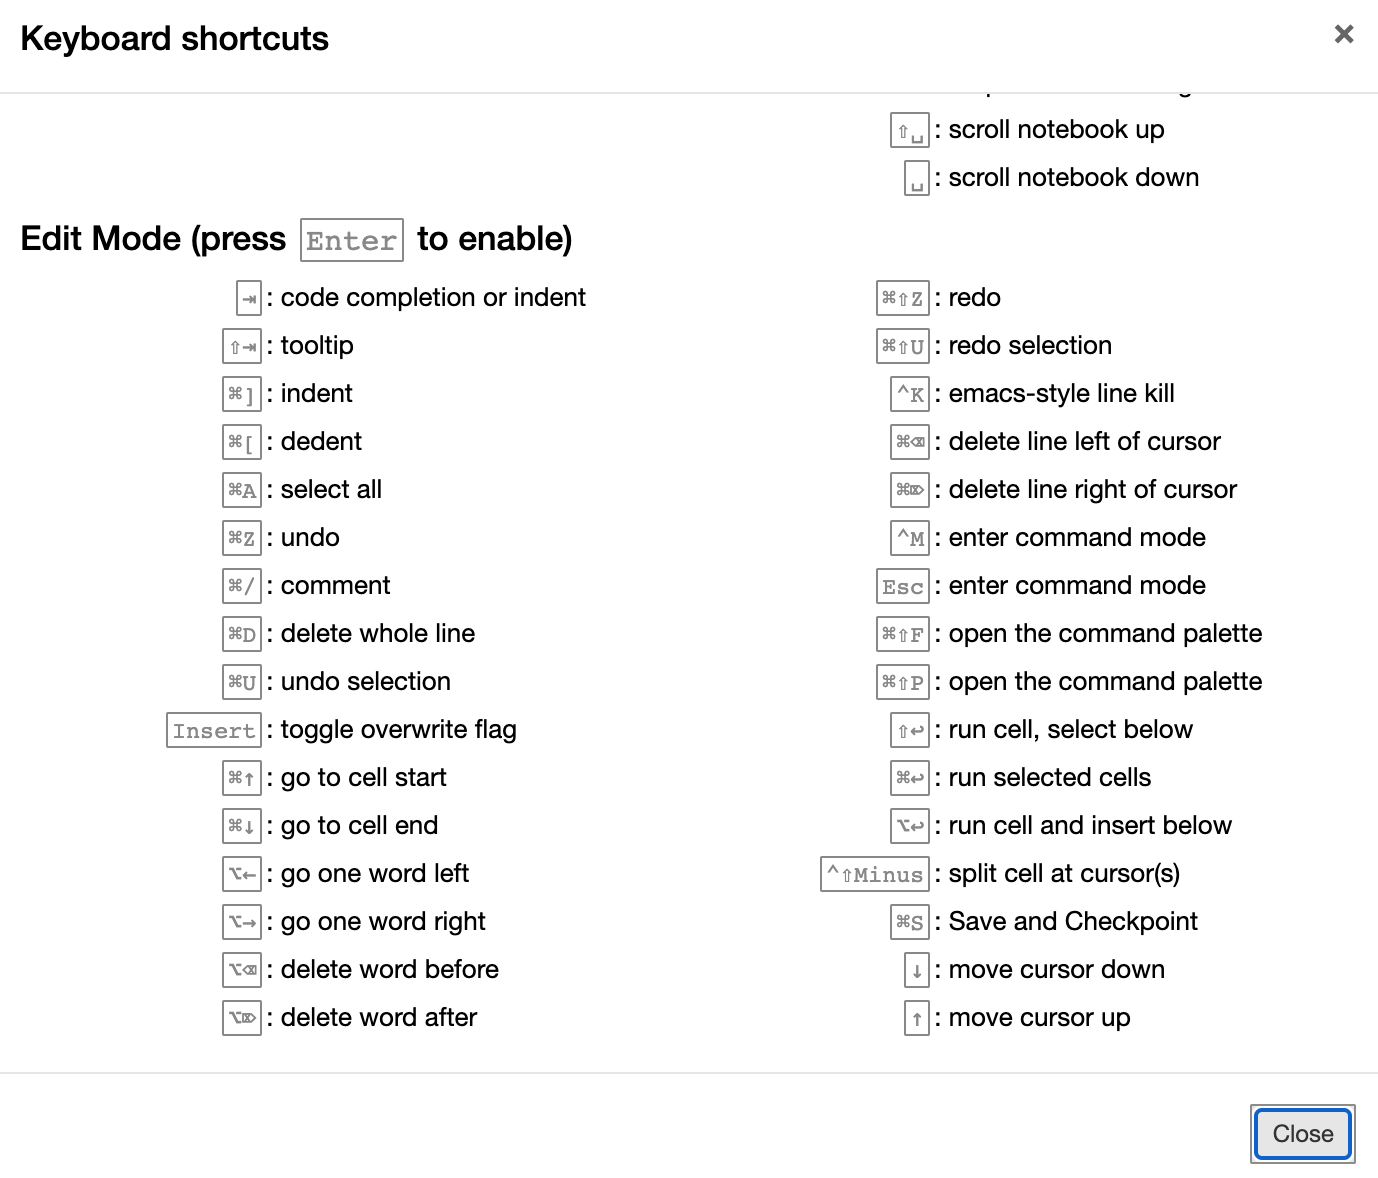
Once you are here, you can even edit your shortcuts by clicking Edit shortcuts.

I personally never do this because I like the default settings, but many do… So you know, if you want to be a Jupyter-shortcut-ninja, here’s your chance! 😉
Syntax help: reading documentation in Jupyter (docstring and signature)
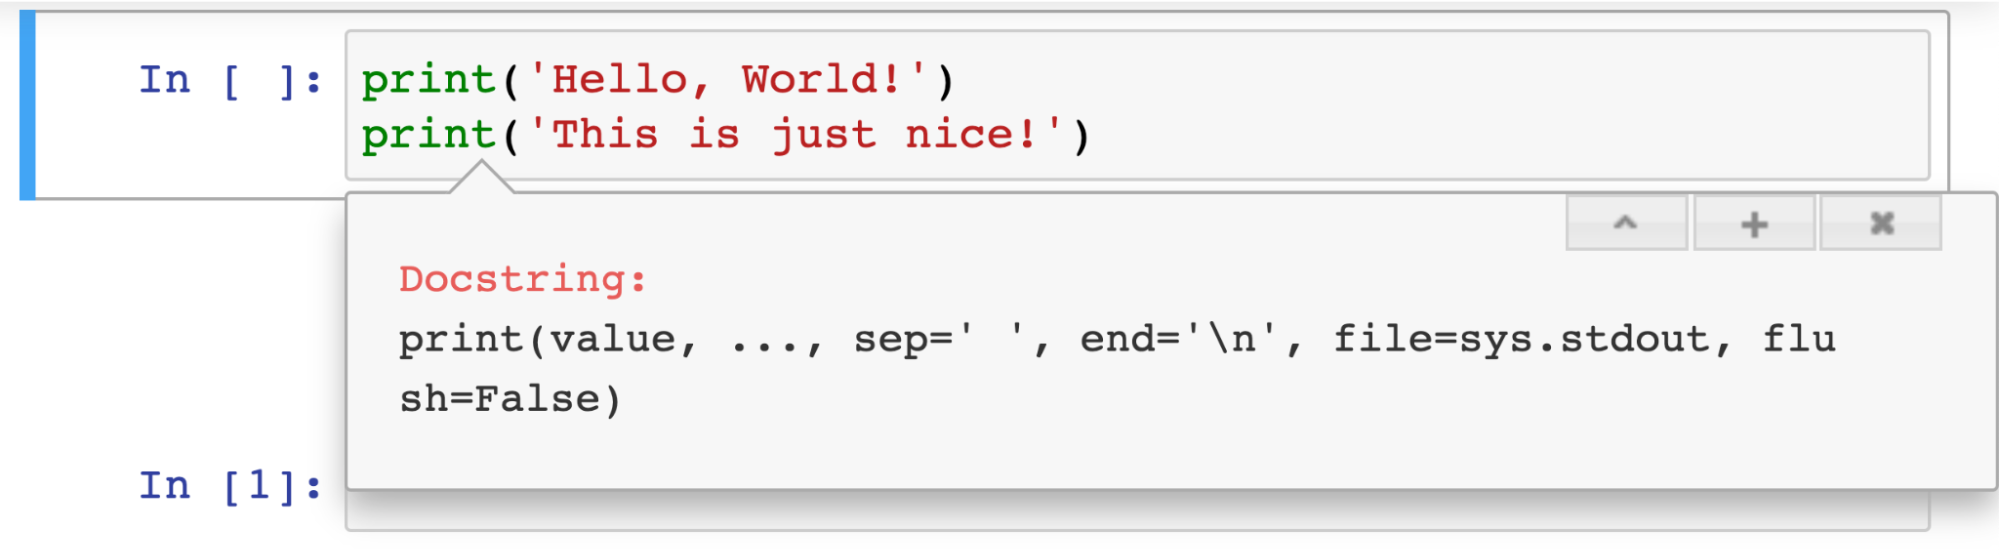
Nobody expects you to know all the tiny details of all Python functions. That’s why we have Google, Stack Overflow and most importantly all the different Python documentation. Regarding this latter one, there’s a pretty cool Jupyter Notebook feature that many don’t know about: you can open a pop up window that will help you with syntax questions. It shows a useful slice (docstring and/or signature) of the related part from the Python documentation for every keyword!
The hotkey for that is: SHIFT + TAB.
Let me show you an example.
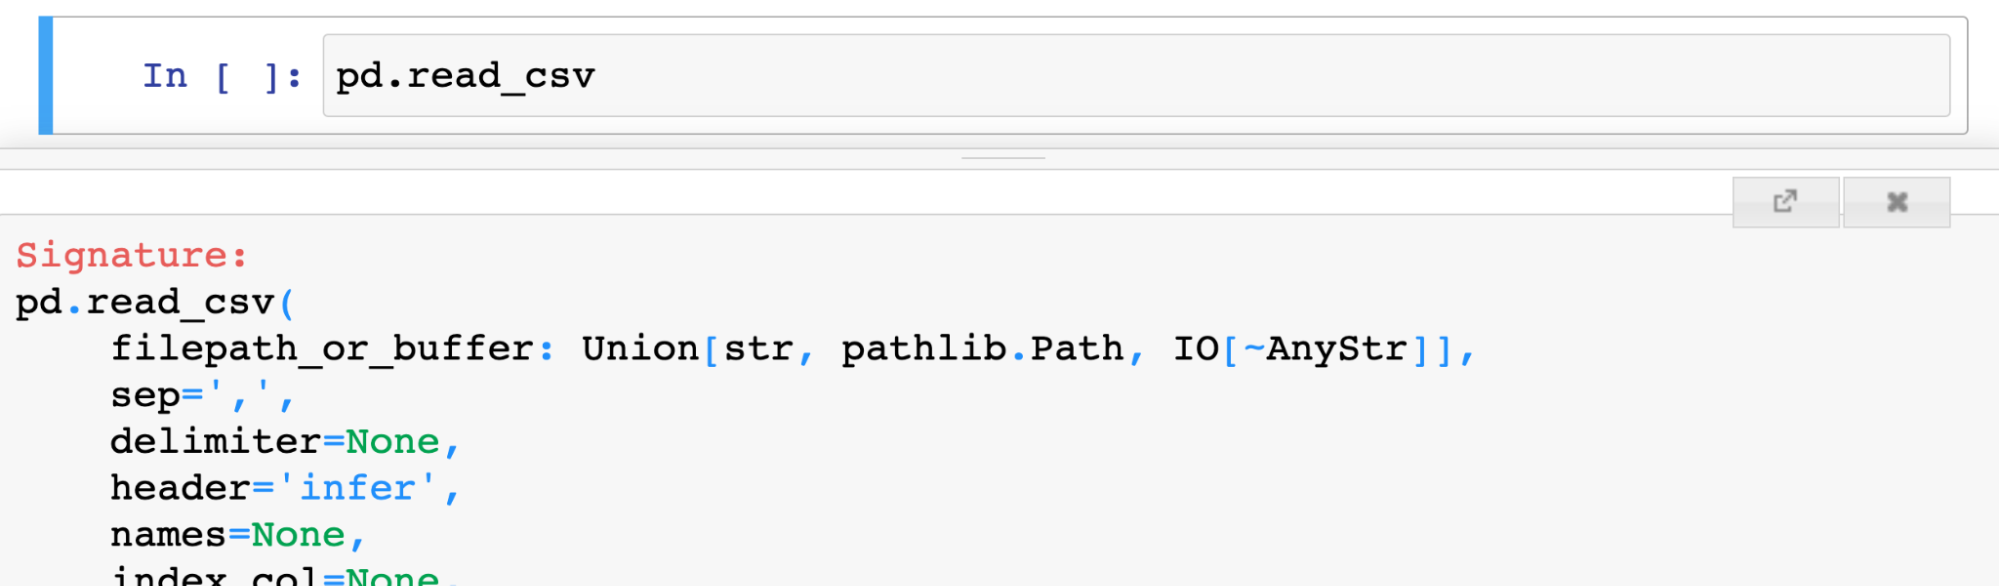
Let’s say that you want to use the pandas read_csv function. But you can’t remember the exact syntax for all the different parameters. No problem, just type:
pd.read_csv
And then hit SHIFT + TAB.
And then this little useful popup window will show you all the information you need. Sort of a mini documentation. Very handy!
Markdown cells + commenting
When you write complex code, commenting is key.
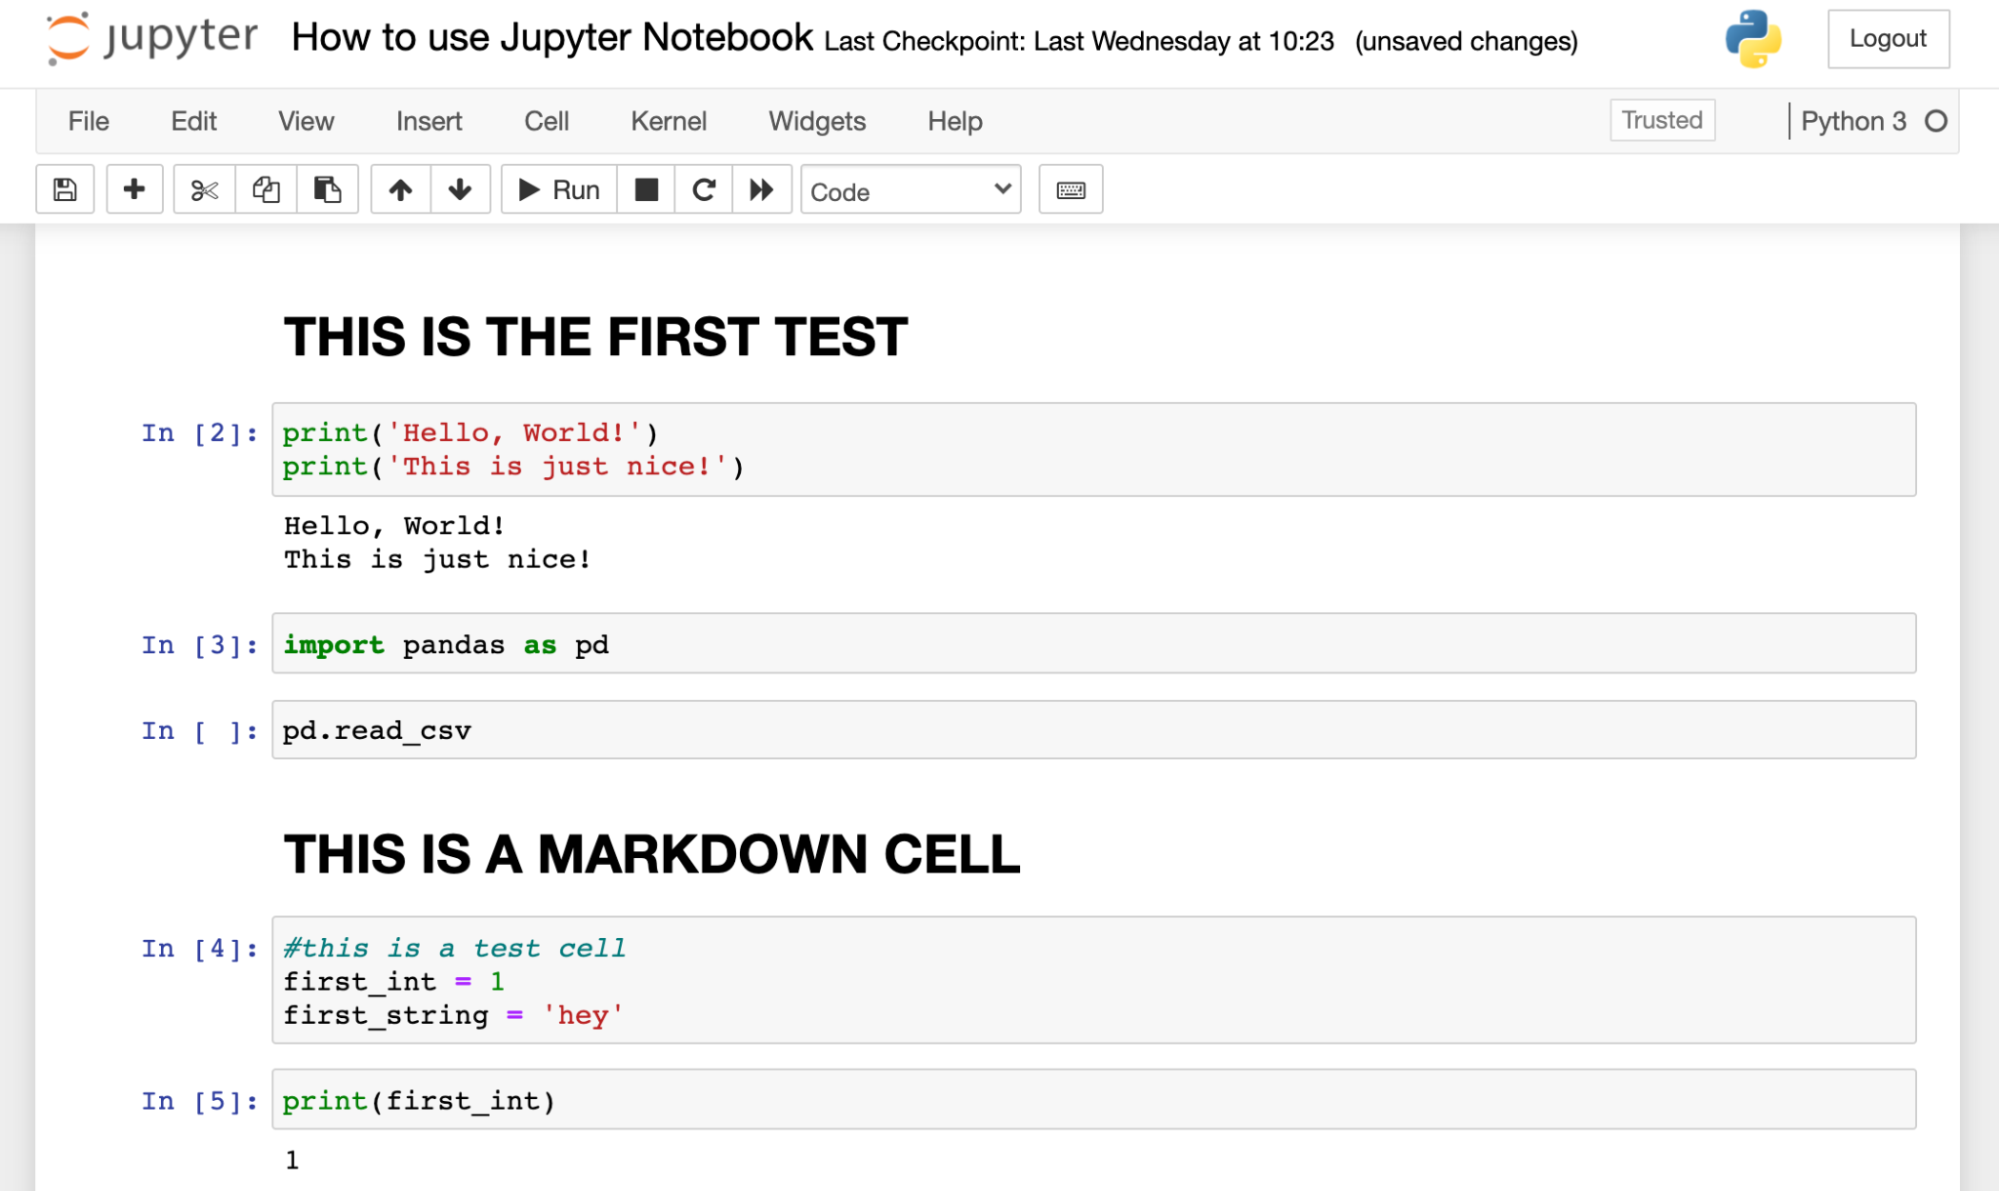
In a Jupyter Notebook, you can comment with the usual hash symbol in the cell itself.
But you can also apply a prettier solution, which is called Markdown.
If you click a cell, you can set it from “Code Cell” to “Markdown Cell“, in the top bar.

Note: And yes, there’s a hotkey for that as well: hit Escape then hit M on your keyboard.
Once the cell is set to “Markdown Cell,” it won’t execute your Python code. After running it, the cell will turn into text.

As it’s visually separated from your code cells, it’s a slightly nicer and more structured way of commenting.
But the strong point of Markdown cells is formatting.
For instance, you can turn your text into Heading if you place a hash character at the beginning of the line. If you add more hashes, you can set the size of the Heading.

Using only this one feature of Markdown will turn your Jupyter Notebooks from an infinite code flow to a nicely formatted, easily readable, well-structured document. And that’s what you want.
Of course, you can go deeper and you can format your comments with Markdown in so many ways: italic characters, bold characters, lists and so on. Read more here.
But really, if you use Heading only, you’ll already have nicer-than-average Jupyter Notebooks.
How to Shut down a Jupyter Notebook properly
The last thing I want to show you here is how you shut down your Jupyter Notebook properly. Many don’t know how to do this — or just forget it. You don’t want to be like that!
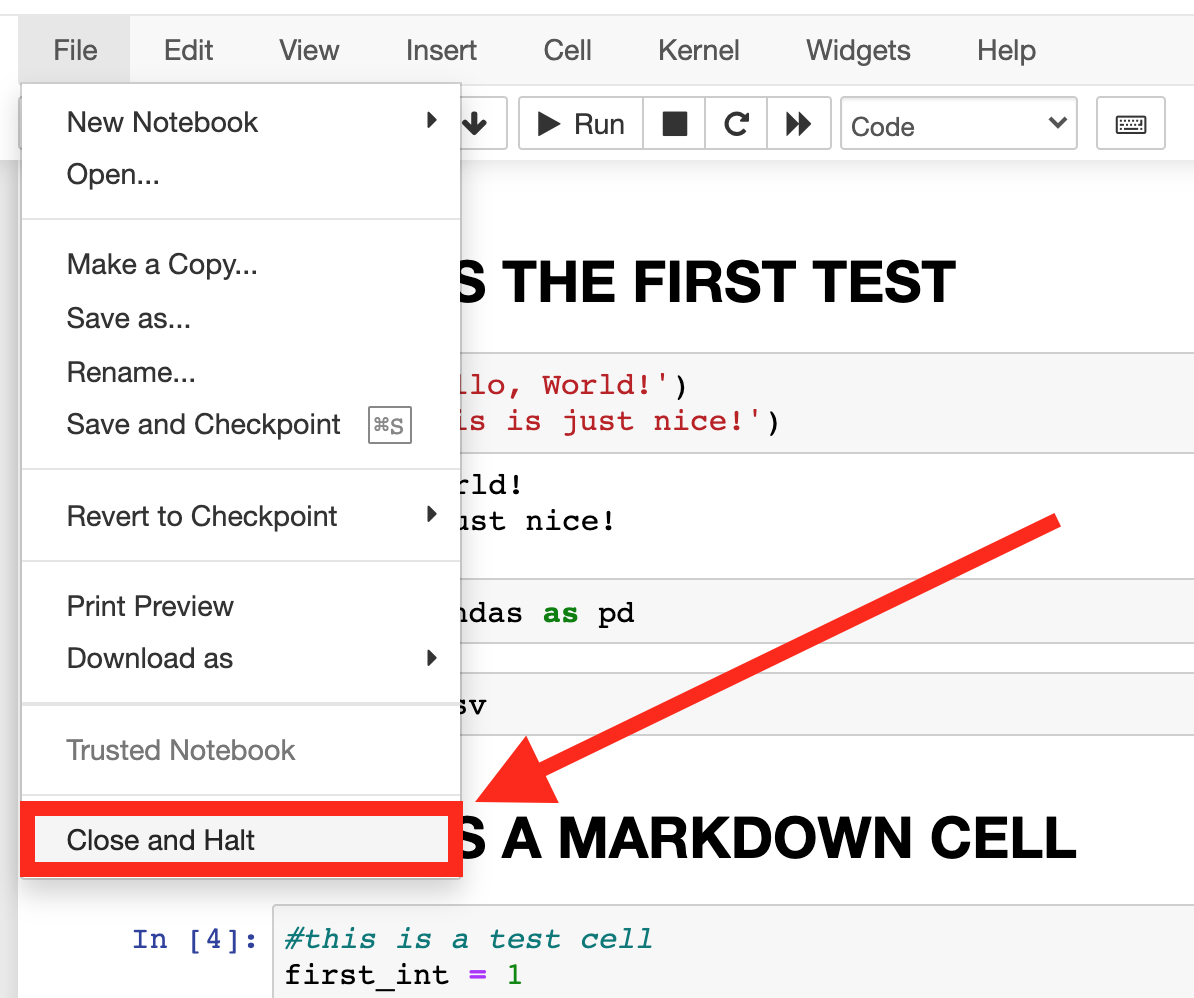
To shut down your Jupyter Notebook properly, you should, first, save your Notebook. And then go to the File dropdown menu and click “Close and Halt.” This won’t just close the window, it’ll also shut down this notebook’s Kernel. This is important because if you just close the window, your Jupyter Notebook will actually still run in the background.
You can even see that if you go back to your folder window. If you see a green icon next to your Notebook, it means it’s still running. That’s not good. The rule of thumb is that you always want to shut down your Jupyter Notebook when you finish working with it. Otherwise, some unexpected bad things could happen. Believe me.
So: click “Close and Halt!“
And we are done!
Conclusion
This was the basics of how to use the Jupyter Notebook. There is much more to learn, but I think this will serve as a good starting point, and you can pick up more advanced techniques while you are learning Python — or even on the job.
So now go ahead and check out my next Python for Data Science tutorial!
- If you want to learn more about how to become a data scientist, take my 50-minute video course: How to Become a Data Scientist. (It’s free!)
- Also check out my 6-week online course: The Junior Data Scientist’s First Month video course.
Cheers,
Tomi Mester
Cheers,
Tomi Mester